Images
How to Tell If a Photo Has Been Edited or Photoshopped
Is this photo photoshopped? Check visual signs, view EXIF metadata, compare versions and read error level analysis with care to reach a defensible finding.
Published · Updated · 18 min read
On this page
To check whether a photo has been edited or photoshopped, compare it with a reliable earlier version when one is available. If you have only one file, examine the relevant region for visual signs of editing, read its metadata and recorded history, and use analysis suited to the suspected change. The goal is to identify what changed and whether that change affects what the photograph is being used to show.
The useful question is usually more precise than “Is this fake?” A resized product photograph may accurately show its condition. A photograph with one scratch removed may misrepresent it. Keep the file's processing history, the visible content and the claim attached to it separate throughout the review.
Start with the evidence you have
If you have a reliable earlier version: open the two originals side by side, match orientation and framing, and inspect the feature at a comparable display size. Start with recognizable landmarks, such as a panel edge or screw. If you cannot make the surrounding scene line up, use the comparison as a lead and seek help before treating a local difference as an edit.
If you have only one photo: identify the exact feature in question, inspect it in the full scene, and check metadata, provenance and local manipulation signals. A useful analysis can identify a region for closer review even when no reference image survives. A source attachment or a separate view may then resolve what happened.
If the question is specifically about generative editing: use the AI-edited photo guide, which separates whole-image classification from localization and AI attribution. The workflow here covers both conventional and generative changes.
1. Define the claim and preserve the received file
Write down the decision the image is supposed to support. For a used appliance listing, this might be: “Does the lower-left door panel accurately show the visible damage?” Identify the relevant region before examining automated results. Otherwise, an attention-grabbing anomaly elsewhere can distract from the actual question.
Preserve the received file, its supplier and acquisition details. Use working copies for viewing adjustments and annotations, and link each analytical output to its input. A cryptographic hash can identify the exact file throughout that process. SWGDE distinguishes this file integrity from the truth of the scene in its Best Practices for Image Authentication, section 2.
When requesting a better source, ask for the file as an attachment rather than a screenshot of a conversation. Record how it was obtained and keep both versions. File size alone does not establish which came first.
Define what counts as a material change under the applicable policy. Cropping an empty margin may be acceptable; cropping away a warning label may change the interpretation. Global brightness adjustment may be acceptable until it hides a faint feature needed for the decision. The relevant standard is the effect on the claim, not whether an editor was involved.
2. Compare reliable versions before interpreting pixel anomalies
An earlier image can offer direct evidence of what changed, but its reliability needs examination too. Record its source and why it is believed to precede the submission. A second export from the same sender may help technically without independently corroborating the history. An independently retained attachment or publication record can strengthen the comparison, provided it really contains the version being discussed.
First determine whether the files show the same capture or separate photographs. Matching perspective, reflections, object positions and background details can support a same-capture comparison. Different viewpoints introduce occlusion and perspective changes; a scratch can disappear under a reflection. Separate views are useful corroboration, but pixel subtraction between them is not an editing map.
For versions of the same capture, use this sequence:
- Check orientation and framing. Account for rotation and identify the common visible area. A crop may remove context even when everything inside it remains unchanged.
- Align working copies. Match stable landmarks around the disputed feature. Registration means placing corresponding scene features at corresponding coordinates.
- Inspect the match away from the disputed area. If nearby boundaries do not align, the comparison is not ready to support a local conclusion.
- Compare the relevant region and the whole scene. Use side-by-side views and an overlay where helpful. Record any transformation used to create the comparison.
For a manual review, stop at side-by-side comparison if alignment requires more than a straightforward orientation or framing adjustment. Technical registration needs a method appropriate to the transformation: translation corrects a shift, while scale and perspective changes need different treatment. scikit-image's registration reference, for example, describes its phase-correlation method as translation registration and notes sensitivity to noise.
Resizing creates new pixel values through interpolation. Small residual outlines can therefore come from alignment, sharpening or resampling. Check the match around the disputed region and retain the originals; forcing that region to match can erase the very difference you want to assess.
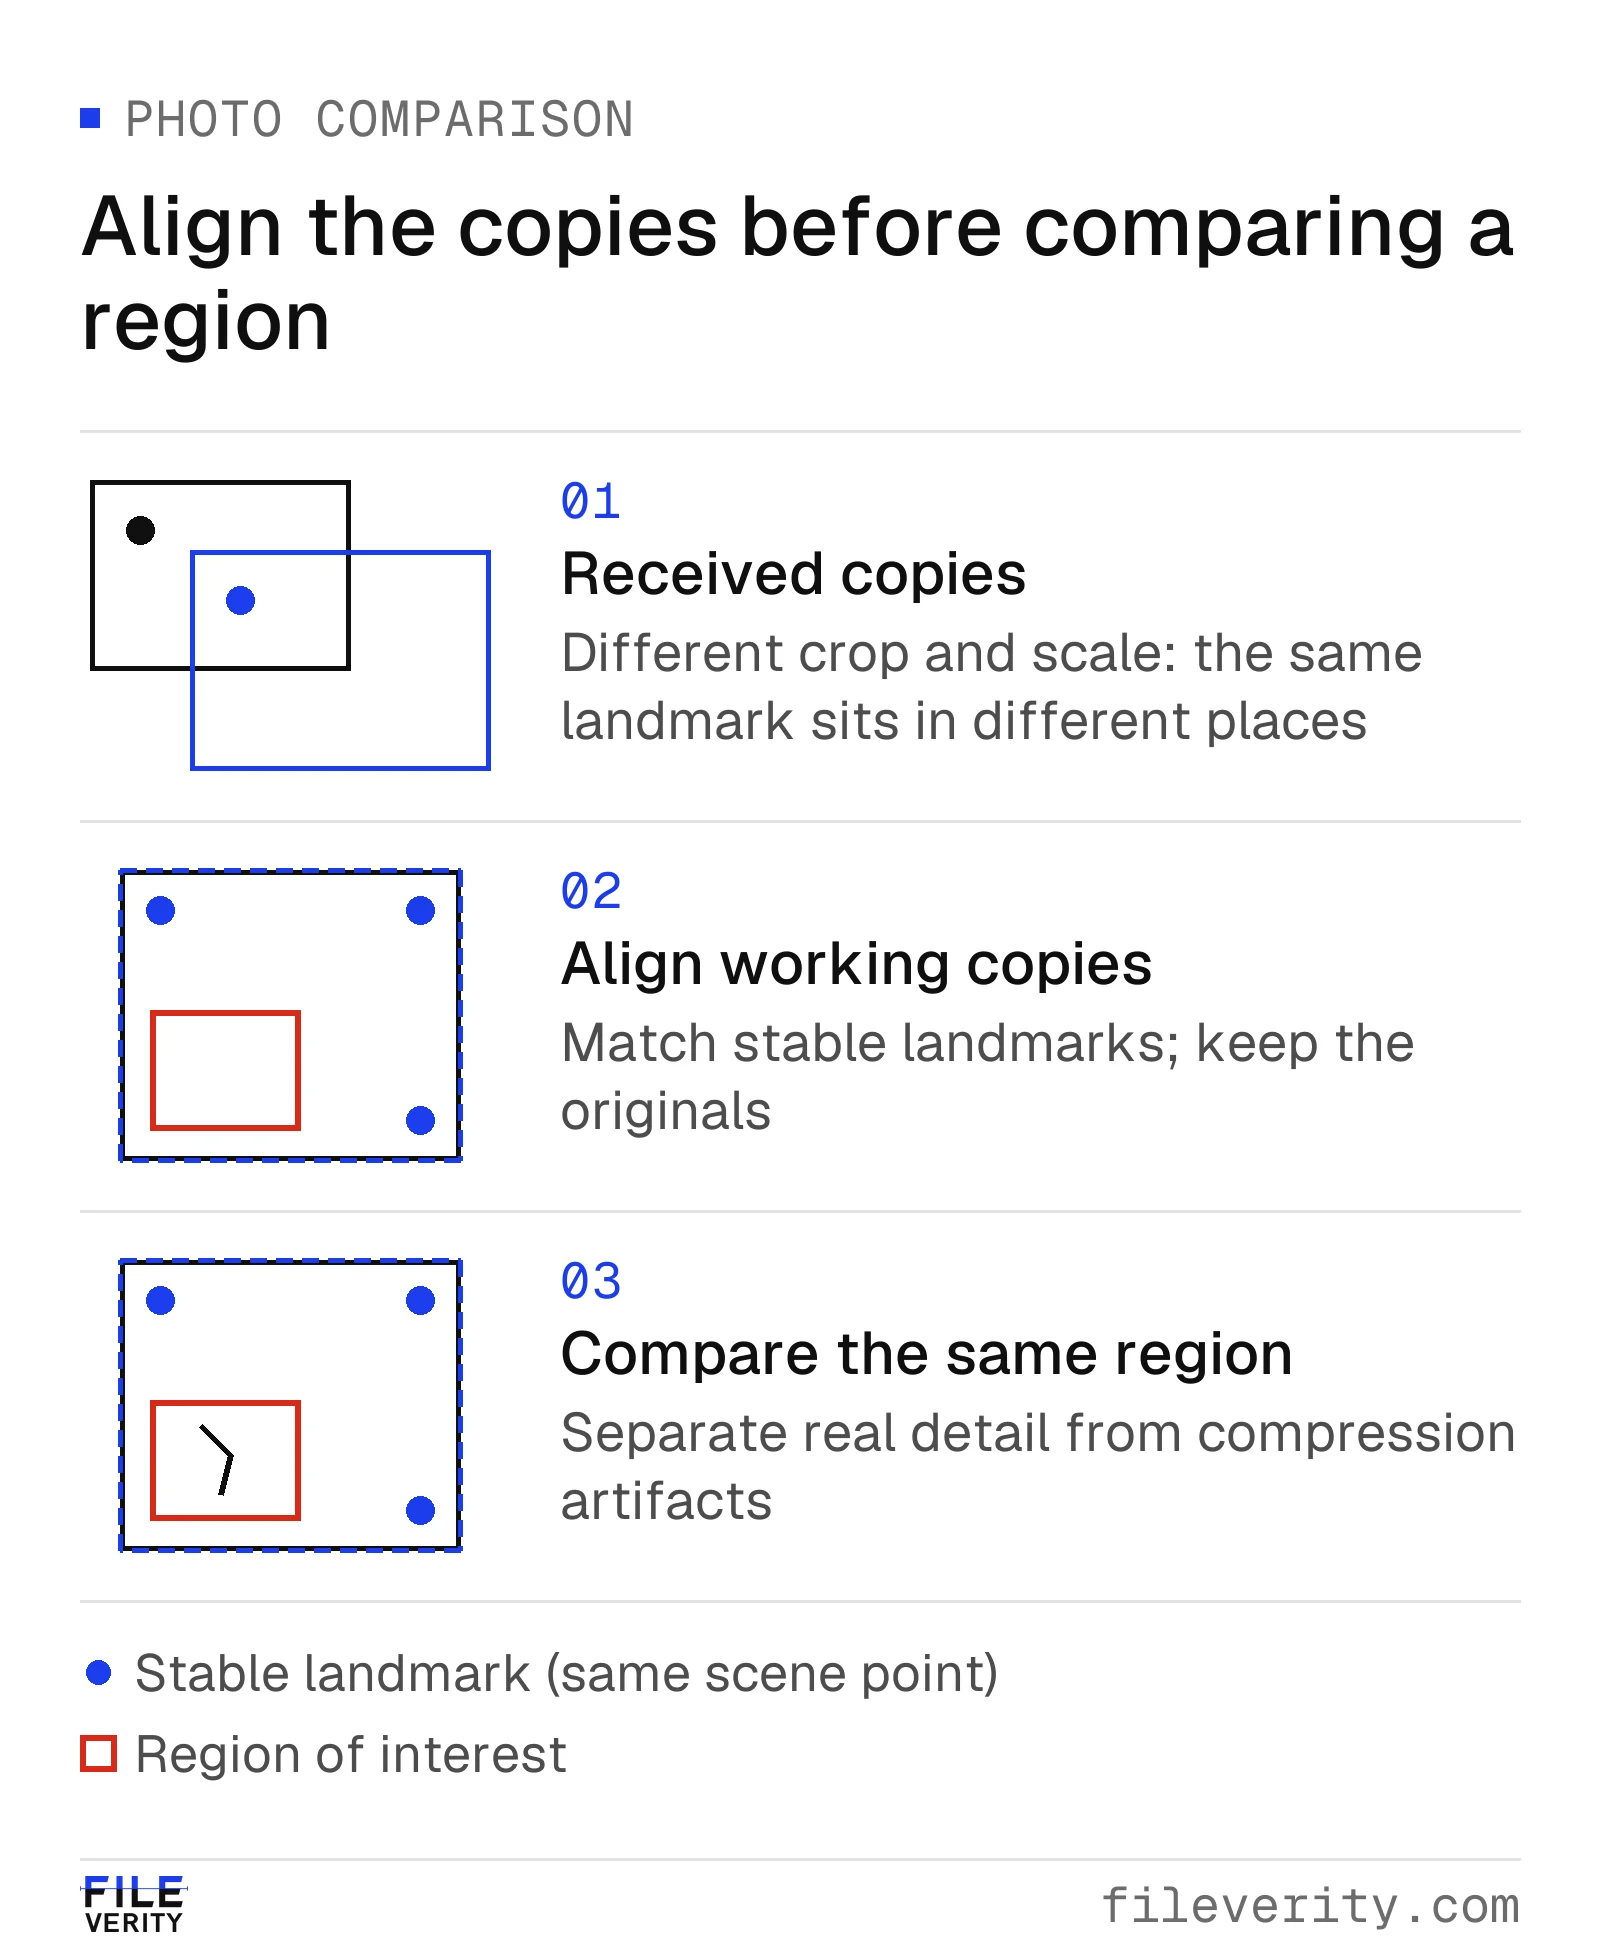
Align stable landmarks on working copies, then compare the disputed feature in the shared scene.
A consequential field: a changed passport expiry year
Consider a hypothetical identity review in July 2028, when the submitted document must be unexpired under the review policy. The source below is a real, openly licensed photograph of an official Dutch passport specimen, published for demonstration. Its visible expiry year is 2024. Fileverity used AI to create a derivative showing 2029, placing that visible date on the other side of the hypothetical review date.
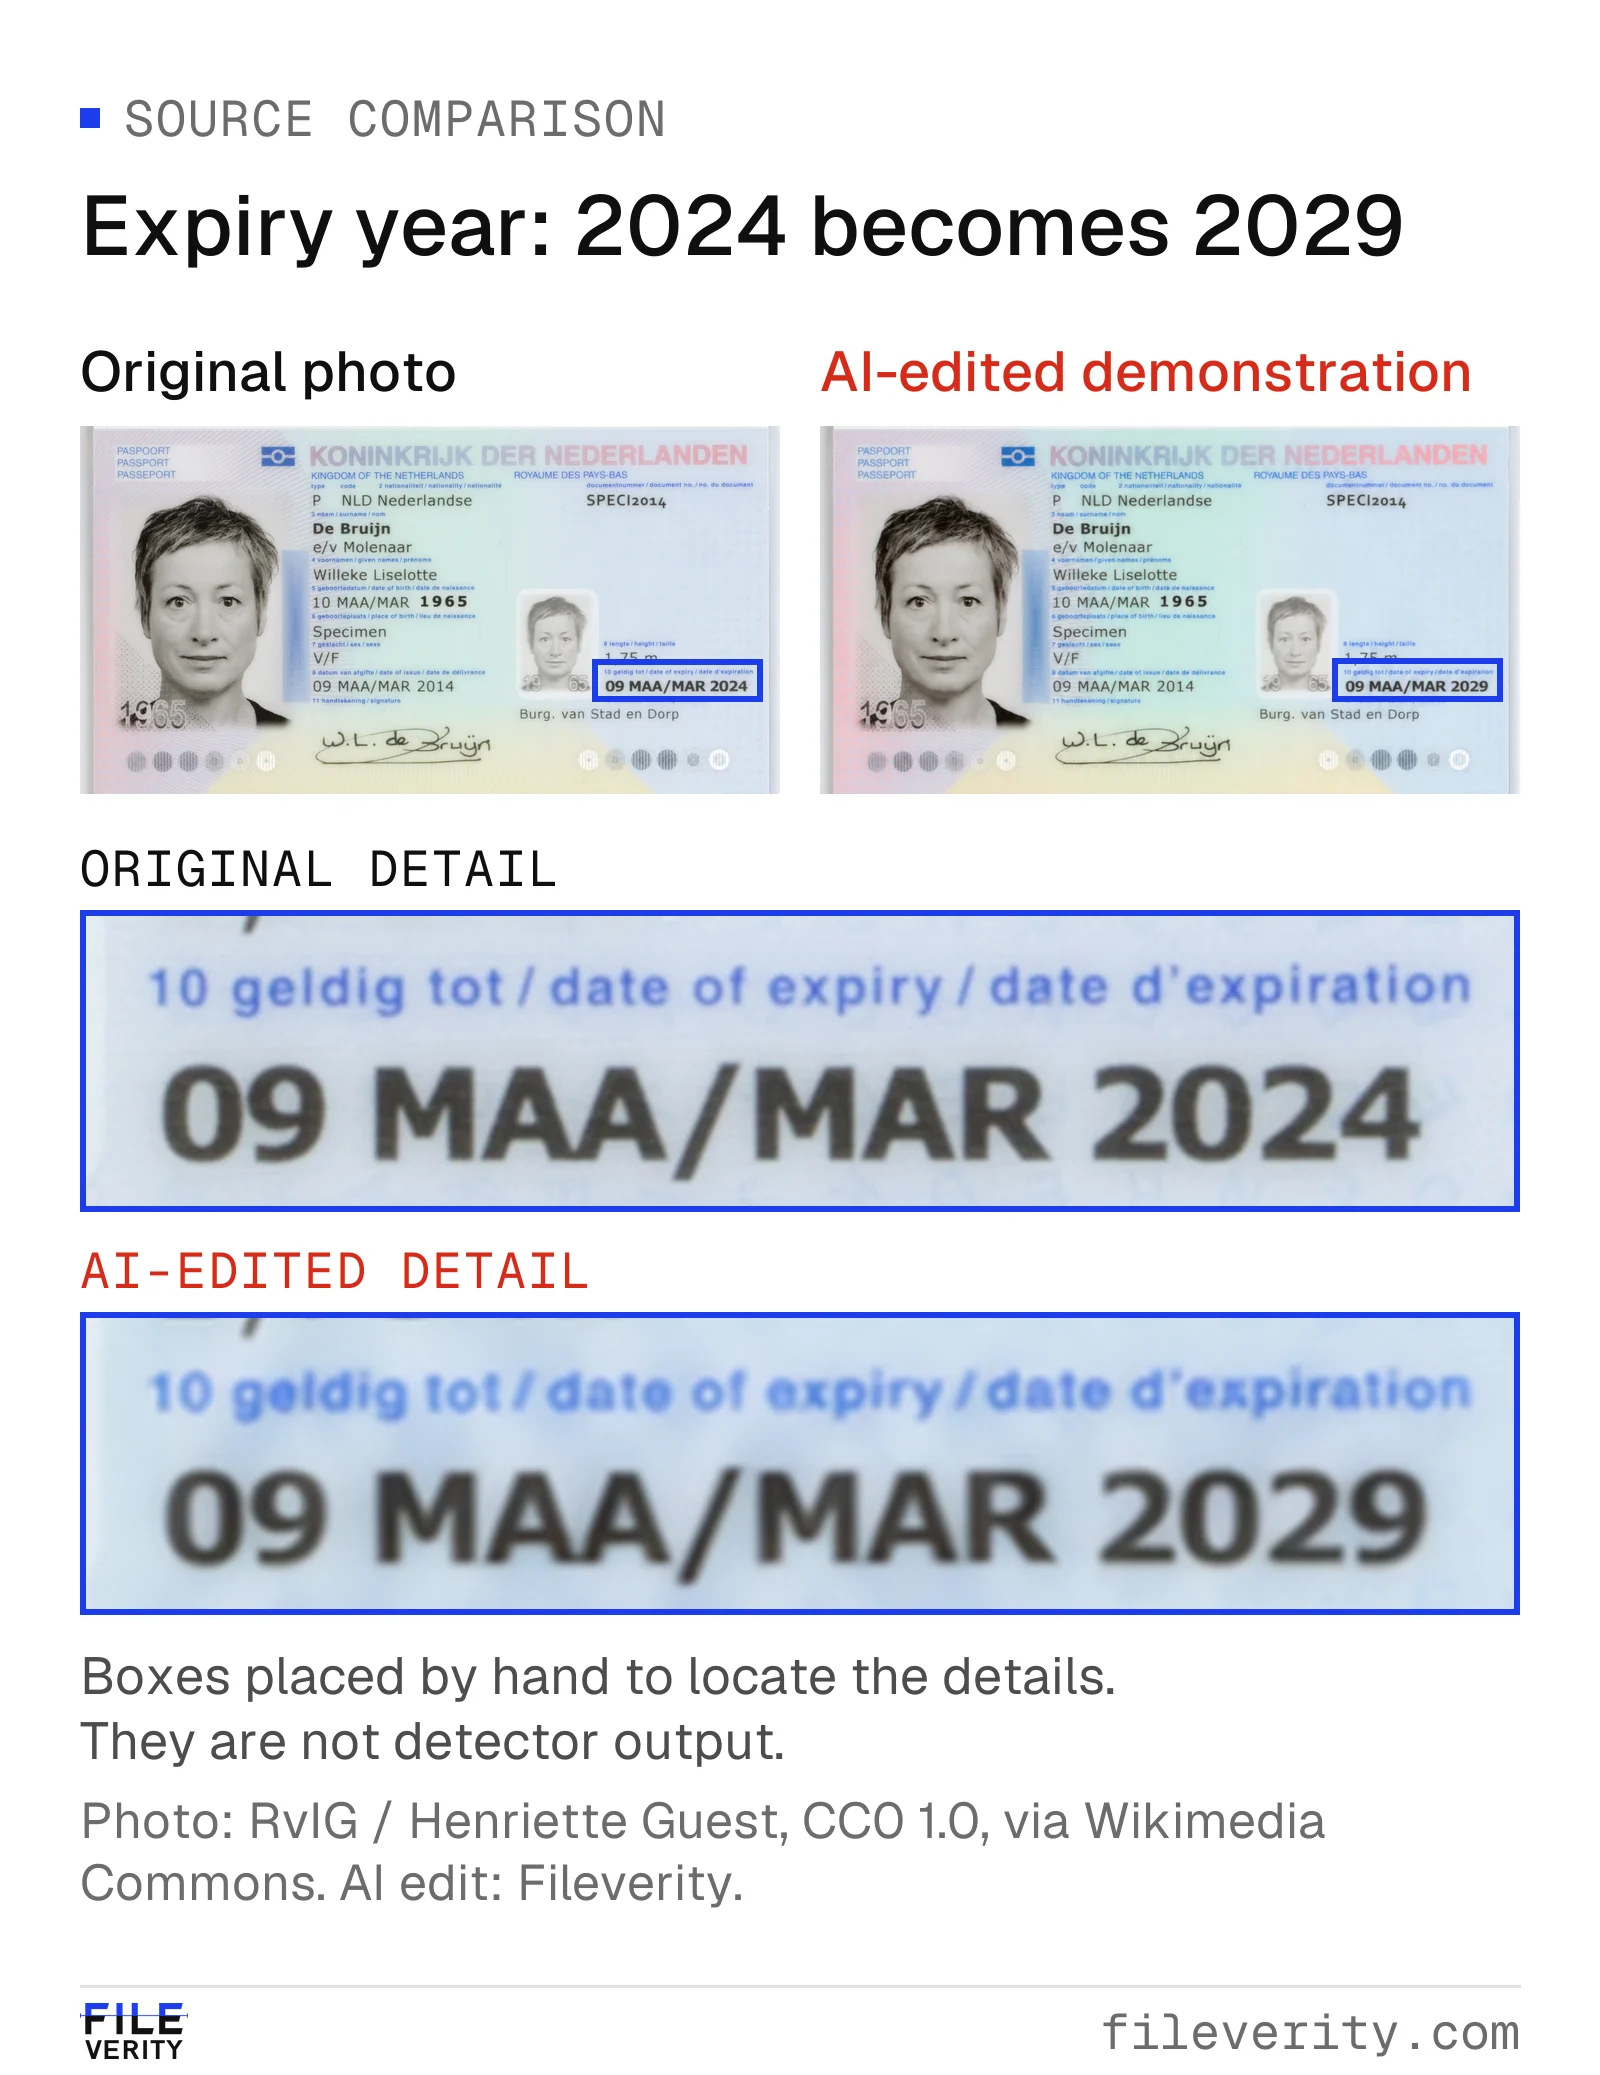
AI-edit demonstration: the expiry year changes from 2024 to 2029. Matching detail crops show the altered field; SPECIMEN markings remain visible.
Source: RvIG / Rijksoverheid, photographer Henriette Guest, official specimen photograph via Wikimedia Commons, CC0 1.0. AI alteration and comparison layout: Fileverity.

The changed field would alter an expiry decision in July 2028. A reviewer should also compare the visible date with the machine-readable zone, which remains unchanged in this example. That cross-field discrepancy shows why a document review needs both local image analysis and consistency checks across the page.
For an actual submission, establish the reference's reliability and use the organization's issuer-verification process to check whether the document was issued and remains valid.
3. Check the photo's metadata and read it as claims about the file
Metadata can include camera information, capture settings, dates, orientation and processing software. SWGDE notes that metadata may be limited, absent or altered; it recommends considering both scene content and file structure rather than treating either alone as decisive. SWGDE, section 7
How to view a photo's EXIF data
Most photo metadata is stored as EXIF fields, with IPTC and XMP alongside. You can see the common fields without extra software:
- Windows: right-click the file in File Explorer, choose Properties and open the Details tab. Date taken, camera maker and model, dimensions and some program fields appear there.
- Mac: in Photos, select the picture and press Command-I. The Info window shows when and where it was taken and camera metadata such as lens and shutter speed. Apple Photos User Guide for Mac
- iPhone: open the photo in Photos, then swipe up or tap the Info button to see the date, location and camera details. Apple iPhone User Guide
- Android: open the photo in Google Photos and swipe up to the details panel for date, location and device information. Menu labels vary between app versions.
- Every field: a dedicated EXIF viewer such as ExifTool lists all embedded fields, including XMP and manufacturer notes that operating-system panels omit.
Treat what these panels display as the library's current view, not necessarily the bytes as captured. The Photos apps on iPhone and Mac let a user adjust a picture's date, time and location, and Google Photos can show a location it has estimated rather than one recorded by the camera. Google Photos Help For a consequential question, export or request the original file and read its fields directly.
A copy that passed through a messaging app, a social platform or a screenshot has usually been re-encoded, so missing fields there say little about the original capture. Ask for the original export before drawing conclusions from absent metadata.
To see the camera, lens, software, dates and GPS location in one place without uploading the photo, use the photo metadata viewer. It reads the file in your browser and also shows its SHA-256 hash.
Which metadata fields matter when checking for edits
A useful metadata review preserves the exact field name and value before interpreting it:
| Field or observation | Useful question | What it does not establish |
|---|---|---|
| Claimed capture date | Does it agree with the independently known sequence, including time zone where available? | A trustworthy clock or confirmed event date |
| File modification date | Does it describe a local copy or a documented processing event? | Necessarily the shutter time |
| Software field | Is an export or processing step plausible? | Which object changed, or who changed it |
| Embedded preview image | Does the small preview stored in the file show the same content as the main image? | Which version came first, or why they differ |
| Dimensions and orientation | Do they explain framing or display differences? | Whether all content is preserved |
| Missing camera or location fields | Can a better source provide them? | A particular reason for their absence |
A Photoshop reference may be consistent with a routine export, correction or substantial alteration. Record the observation without selecting one explanation prematurely. Likewise, a coherent set of dates is useful context but is not independent confirmation of its own accuracy.
Resolve consequential time or place questions with a documented receipt record, contemporaneous view or trusted source record, alongside the metadata.
4. Check provenance without treating it as a truth badge
Content Credentials can provide signed provenance information about an asset and recorded actions. Review the actual validation result, the signer information, the actions represented and any gaps. Merely finding a credential or seeing a badge is not the same as inspecting its validation status.
The C2PA 2.2 Explainer, sections 7.1–7.2 says that provenance can be incomplete and does not by itself establish that content is accurate or factual. It also cautions against judging trustworthiness solely from the presence or absence of Content Credentials.
For a disputed scratch, a recorded crop or export may explain the framing or file difference. Compare that history with the visible region. If credentials are unavailable, continue with the file and reference evidence rather than assigning significance to their absence.
5. Look for visual signs of editing, then return to context
Start at normal viewing size to understand the scene. Inspect the disputed feature at native resolution, then enlarge it only to examine existing detail. Magnification does not recover a number or boundary that the file never resolved.
Describe visible observations in neutral terms: “a repeated texture beside the panel edge” is more useful than “obvious cloning.” Check whether the pattern is distinctive or simply repeated construction, fabric or tiles. For an unusual shadow, include nearby light sources and reflective surfaces in the view. A close crop may exclude the explanation.
Record the region's location in the original file, its approximate pixel dimensions and the surrounding area considered. If a model highlights a patch outside that region, explain whether it has any bearing on the claim. A background anomaly does not establish that a price, serial number or damaged corner was altered.
Ask whether available detail can support the proposed conclusion. If the feature occupies only a few pixels, is hidden by glare, or was cut off in the submitted version, further software analysis may not resolve it. A new view or better source is often the more useful next step.
Visual signs a picture has been photoshopped
These are the observations most worth checking when someone asks “is this photo photoshopped?” Each one is a reason to look closer, and each has ordinary explanations to rule out first.
| Sign to check | Where to look | Ordinary explanations |
|---|---|---|
| Straight lines that bend near a subject | Door frames, tiles, shelves and horizons beside a body or object that may have been reshaped | Wide-angle lens distortion, panorama stitching, curved surfaces |
| Shadows or lighting that disagree | Shadow direction and softness, and the color of light on one object compared with its surroundings | Several light sources, light reflected from nearby surfaces |
| Repeated patches | Identical clouds, grass, gravel, crowd members or texture that may have been cloned over something | Genuinely repetitive materials such as fabric, bricks or tiles |
| Halos, cut-out outlines or a sharpness mismatch | The boundary of an inserted or retouched object, and whether its grain matches the rest of the frame | Sharpening, portrait-mode background blur, compression |
| Perspective, scale or reflections that do not fit | Object size against nearby references, reflections in mirrors, windows and water | Lens perspective, curved or uneven reflective surfaces |
| Characters that differ from their neighbors | Font, spacing, alignment and blur of a date, price or serial number | Uneven printing, focus falloff across the page |
None of these signs proves editing on its own, and their absence does not prove a photo is untouched: careful retouching and generative fills often leave none of them visible. Record the sign, its location and the explanations you ruled out, then confirm it with a reliable earlier version, the file's recorded history or local analysis.
This is where Fileverity image verification fits. It checks the file for AI generation, local manipulation and provenance and shows which region a finding concerns. For a disputed scratch, an image analysis can mark suspicious regions with pixel coordinates, so the reviewer can see whether the finding concerns that panel and warrants a source comparison or another view.
Inside local analysis: from a score map to a usable region
One principle in Fileverity's manipulation analysis is to preserve spatial evidence and summarize candidate regions. The computational object is a score map, an array whose positions correspond to locations in the analyzed image. A map supplies more information than one image-level label, but its coordinates and resolution determine how precisely a reviewer can use it.
A common region-building operation selects map positions under a defined decision rule, then groups neighboring selected positions into connected components. Each component has an area and an enclosing rectangle. Connectivity is a geometric convention: whether diagonal contact joins two positions changes the resulting groups. SciPy's documentation illustrates this difference directly. The choice of connectivity affects how a region is summarized. SciPy connected-component labeling
A bounding rectangle is not the selected area. In a toy map, six selected cells can occupy a 3 × 4 rectangle containing twelve cells. Calling all twelve “edited” would double the selected area before considering whether the six selections are correct. For a date-field review, the rectangle is useful as a navigation aid; it is not evidence that every enclosed digit changed.
The region must also be mapped back to the correct source coordinates. With a pure resize and no crop, padding or rotation, the geometric relationship is x_source = x_map × W_source/W_map, with the corresponding height ratio for y. Suppose an illustrative 4,000 × 3,000 photograph has a 1,000 × 750 analysis map. A box starting at (100, 150), with width 20 and height 30, maps to (400, 600), width 80 and height 120. One map-cell displacement corresponds to four source pixels. Displaying the map smoothly at full size cannot recover finer independent spatial evidence.
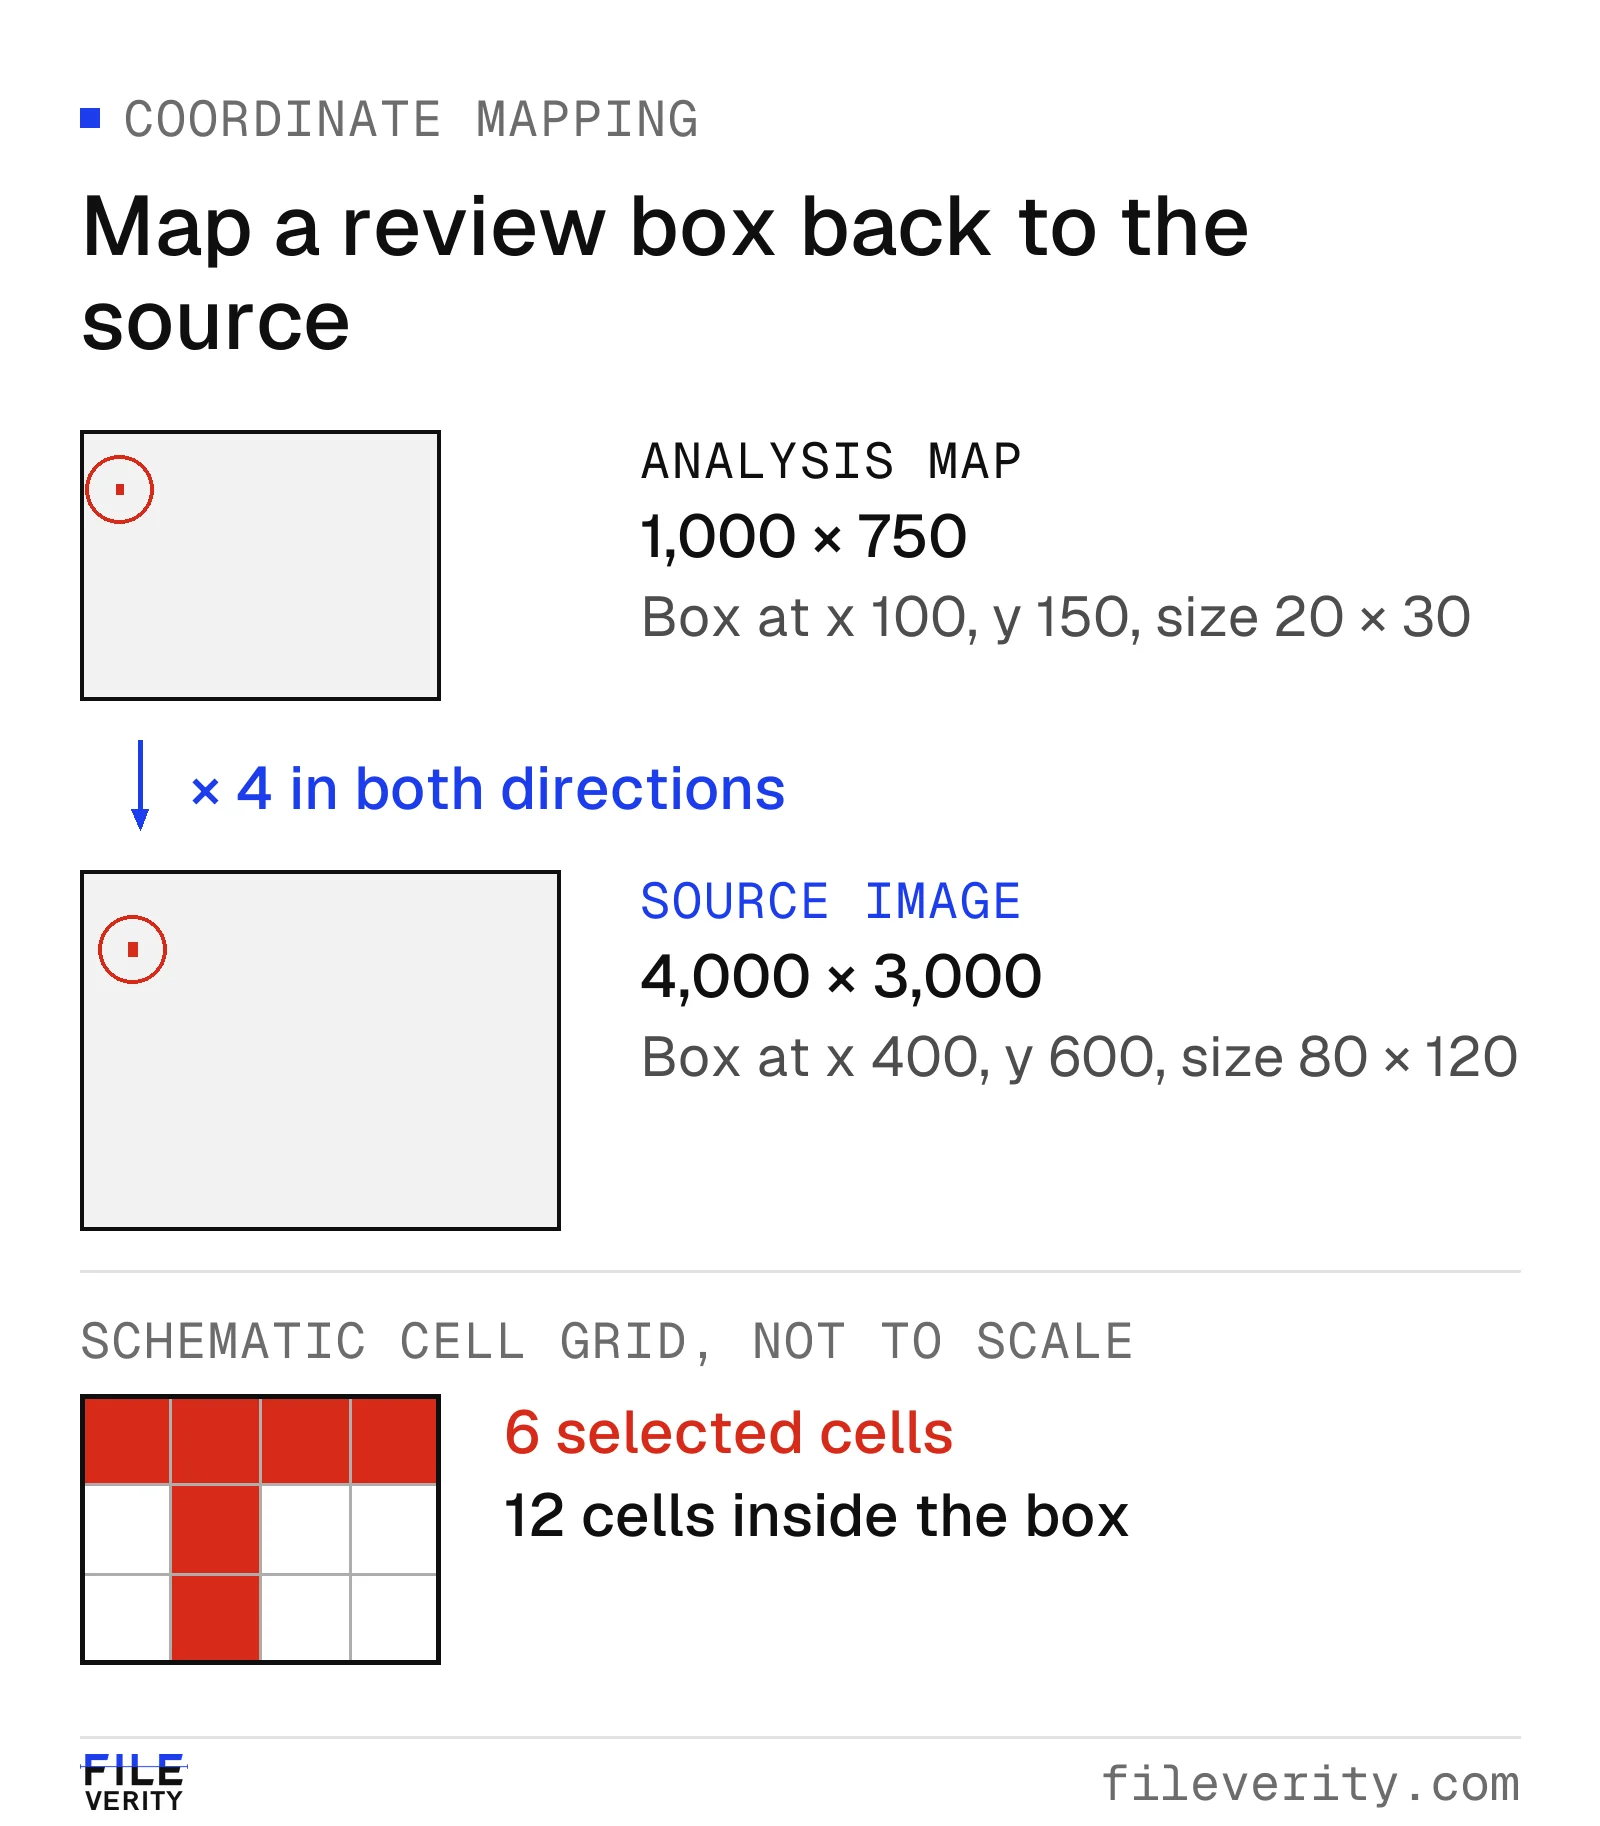
Illustrative coordinate mapping: a fourfold scale change maps the analysis box back to the source. Its enclosing rectangle can contain unselected cells.
This is why the passport expiry field must be checked against the submitted image, not a detached overlay. Establish whether the candidate region actually overlaps the year and whether the available resolution supports that association. If cropping or orientation changes occurred, include those transforms before comparing positions. A spatial anomaly estimate, its reliability and an image-level decision are separate outputs; keep them separate in the review record.
For procurement, ask for examples where the disputed field is small, and assess whether the region output leads reviewers to the correct feature. Check the highlighted field against a reliable reference or issuer record to resolve the discrepancy.
6. Use error level analysis and other forensic tools as leads
Compression artifacts are not automatically editing artifacts
Lossy compression can introduce blocking, local color distortion and loss of fine detail. Further saves can introduce additional losses; simply opening and closing a file without saving does not recompress it. SWGDE discusses these effects in its Digital Image Compression and File Format Guidelines, sections 2.3–2.4.
That means a fuzzy boundary is an observation with competing explanations. Check whether similar edges elsewhere show the same degradation and whether a better version resolves it. Exporting a JPEG to PNG preserves its decoded pixels for subsequent work; it does not undo earlier compression or recover lost detail.
Noise analysis depends on the method's assumptions
Noise analysis examines statistical variation rather than simply looking for visible grain. Different methods estimate different quantities. For example, UTIA's noise-inconsistency research description describes partitioning images into regions with similar noise levels under an additive white Gaussian noise assumption. Its stated task is detecting changes in noise level.
To use such a result, check the method's noise model, required image area and suitability for the received file. Then compare the identified region with its surroundings and processing history. Visible texture alone is not a calibrated noise measurement.
Error level analysis is a recompression comparison
Error level analysis, or ELA, compares an image with a JPEG-recompressed version and visualizes the differences. That mechanism is described in Neal Krawetz's 2007 Black Hat paper, section 3.4.2.
A bright ELA area means a larger displayed residual under the selected settings. It is not a probability of forgery. Since the measurement is a recompression difference, the reviewer must consider image detail, boundaries and processing history before attributing the residual to content alteration. Applying JPEG compression to a PNG creates a new comparison; it does not reveal a missing original JPEG history.
FotoForensics' own ELA tutorial lists the situations that most often mislead a reviewer:
- Edges and texture glow anyway. High-contrast edges and detailed textures appear brighter than smooth surfaces in unedited photos, so compare edges with edges and surfaces with surfaces.
- Flat areas look dark. Skies, walls and other uniform regions show little residual whether or not they were touched.
- Resaving erases the signal. Each save at lower quality darkens the result; after enough resaves, ELA shows nothing that could reveal a modification.
- Global processing changes everything. Scaling, recoloring and added noise affect the whole image and can mask or mimic a local edit.
- The format has to fit. ELA assumes JPEG compression history; heavily color-reduced formats are unsuitable.
Record the tool, settings, display scaling and input version if ELA is used. Use the map to identify a region worth comparing, and retain the underlying observation rather than interpreting brightness as a forgery verdict. Different color renderings of the same residual remain one measurement.
Free image forensics tools and “photoshop checkers”
Free tools put these techniques within reach. FotoForensics is a web service built around ELA and metadata; as with any upload service, check its terms before submitting a confidential file. Forensically runs in the browser and offers clone detection, ELA, noise analysis, metadata, thumbnail and C2PA views; its author states that images stay on your computer, and describes it as an inspection aid that, like a magnifying glass, cannot tell true from false.
That description applies to every tool of this kind. Each one renders a signal for a person to interpret. None returns a verdict that a photo was photoshopped, and a tool labeled as a “photoshop checker” is still showing you a recompression residual, a noise pattern or a metadata field. Use these views to choose where to look, then confirm with a comparison version or the file's history.
A learned local-manipulation detector answers a different question: it is trained to score regions of the image as likely changed and returns a map. Read that map with the cautions in the score-map section above, and for generative fills specifically follow the AI-edited photo guide.
Worked example: a resized listing and a disputed scratch
Consider a hypothetical used-appliance listing. The received image is 1,200 pixels wide. An independently retained earlier attachment is 4,000 pixels wide and appears to show the same capture. The listing policy permits resizing and global brightness correction but requires visible defects to remain represented.
The reviewer preserves both files and locates the lower-left panel in each. Stable screw positions and panel boundaries support alignment. The listing is brighter, so the reviewer checks other faint marks before interpreting the scratch. They also confirm that the disputed region is still within the crop.
Scenario A: the scratch survives. Its shape and location agree in both files at a comparable display scale. Differences also occur along other edges and are consistent with resizing and presentation changes. The appropriate finding is: “No material discrepancy was identified in the scratch region between these versions.”
Scenario B: the scratch is absent. Nearby faint features remain visible, surrounding landmarks match, and the discrepancy persists when viewing the original files. The earlier retained record corroborates the scratch's presence in that capture. This supports a material local change, subject to the stated comparison limits. It does not establish the responsible person, the editing application or intent. The reviewer requests the source/export history and routes the discrepancy to the decision owner under the listing policy.
The key distinction is whether the relevant feature remains faithfully represented. Both scenarios involve processing; only the second supports the specific material-change finding.
Where a Fileverity report helps: run the listing image through image verification. Review any supported region findings alongside the editing-software records available in the file. The full report identifies the examined image by its SHA-256 fingerprint and records timestamp validation status, so the comparison with the earlier attachment can be retained in the same case record.
Keep a structured evidence record
Use one record per question so another reviewer can retrace the comparison:
| Record field | What to retain |
|---|---|
| Question and policy | Feature being assessed; changes that would affect the decision |
| Inputs | File IDs, hashes where used, dimensions, source and receipt details |
| Reference reliability | Why a comparison version is earlier or independently retained; remaining uncertainty |
| Relevant region | Coordinates in the received file, region size, full-scene context |
| Method | Tool/version, settings, alignment and display transformations |
| Observation | What was directly seen or measured, without assigning intent |
| Inference | Explanation supported by the observation and alternatives considered |
| Corroboration | Separate records or views, with their acquisition details |
| Limitation | Missing history, poor resolution, glare or uncertain registration |
| Action and owner | Request better material, accept within scope or escalate; responsible reviewer |
Close the review with a bounded outcome: no relevant discrepancy identified, evidence supports a specified alteration, or insufficient evidence. State which files and region the outcome covers. If another file arrives, add a new review entry rather than silently replacing the original conclusion.
Choose the next check
With a reliable comparison image, start side by side and record the specific difference. For a single file with a local concern, use Fileverity image verification: the full report presents supported suspicious regions and the evidence behind each finding, so you can connect it to the area under review.
For teams reviewing submissions repeatedly, tell us your image formats, typical processing history and the changes that affect your decision, and we will walk your team through real cases; talk to sales. Fileverity analyzes files on servers operated by Entogo in Toronto, Canada and deletes them once the analysis is complete. The Trust & security page sets out data handling, including private deployment for Enterprise on request. If the concern specifically involves generated patches, continue with how to detect AI-edited photos.
Common questions
Does a low AI score rule out photo editing?
No. A classifier for generated imagery answers a different question from whether a local object or number was changed. Check the analysis task and its documented limits.
Can an unedited photo still mislead?
Yes. A false caption, wrong date or staged scene can undermine the claim without requiring a digital content edit. Verify the claim separately from the file.
Is there a reliable photoshop checker?
No single tool can certify that a photo is unedited. Error level analysis, noise views and metadata viewers show signals that need interpretation, and a learned detector reports regions with a stated reliability. Use them to find what to compare, then confirm with an earlier version or the file's history.
Can metadata prove a photo was edited?
No. A software field or a modification date shows that the file was processed or saved, which is routine. Metadata can also be removed or rewritten. It tells you which questions to ask, not which object changed.
Why is the metadata missing from a photo I received?
Screenshots, messaging apps and social platforms usually re-encode images, and many fields do not survive. Missing metadata in a forwarded copy is weak evidence either way; request the original file as an attachment.
When should the review stop?
Stop when the available material cannot resolve the defined question and further transformations add no independent information. Record the limitation and request the specific evidence needed, rather than forcing an authentic-or-fake label.
By Yang Zheng